Health Care
Nightscout on Raspberry Pi
Nightscout, is an open-source, community-driven platform that enables real-time access to diabetes data, allowing individuals with diabetes and their care teams to remotely monitor glucose levels and make more informed treatment decisions. Our guide provides a step-by-step instruction on how to deploy a personalized version of Nightscout on a website at no cost.
NOTES:
- 1. A Dynamic DNS service must be active.
- 2. The internet service provider must allow for the opening of port 443.
- 3. Port forwarding on the router must be set up to redirect traffic from port 443 to the Raspberry Pi’s IP address.
WHAT YOU NEED:
- • Raspberry Pi 4.
- • SD Card.
- • Card Reader.
Step One - Raspberry Pi
- 1. Download the Raspberry Pi Imager and launch the application.
- 2. Select the “CHOOSE OS”.
- 3. From the list of available operating systems, select “Raspberry Pi OS (other)“.
- 4. Choose “Raspberry Pi OS Lite (64-bit)“.
- 5. Go back to the main menu and select “CHOOSE STORAGE”.
- 6. Select the SD card.
- 7. Click on the gear icon located on the bottom right corner of the screen to access the settings.
- 8. Enable the SSH option.
- 9. Enter a password in the designated field.
- 10. Click “SAVE” to save the changes.
- 11. Click “WRITE” to begin the installation process.

Step Two - PuTTY
- 1. Download Putty and install it.
- 2. Locate the IP address of your Raspberry Pi using either the router settings or by using the Fing app on your mobile device.
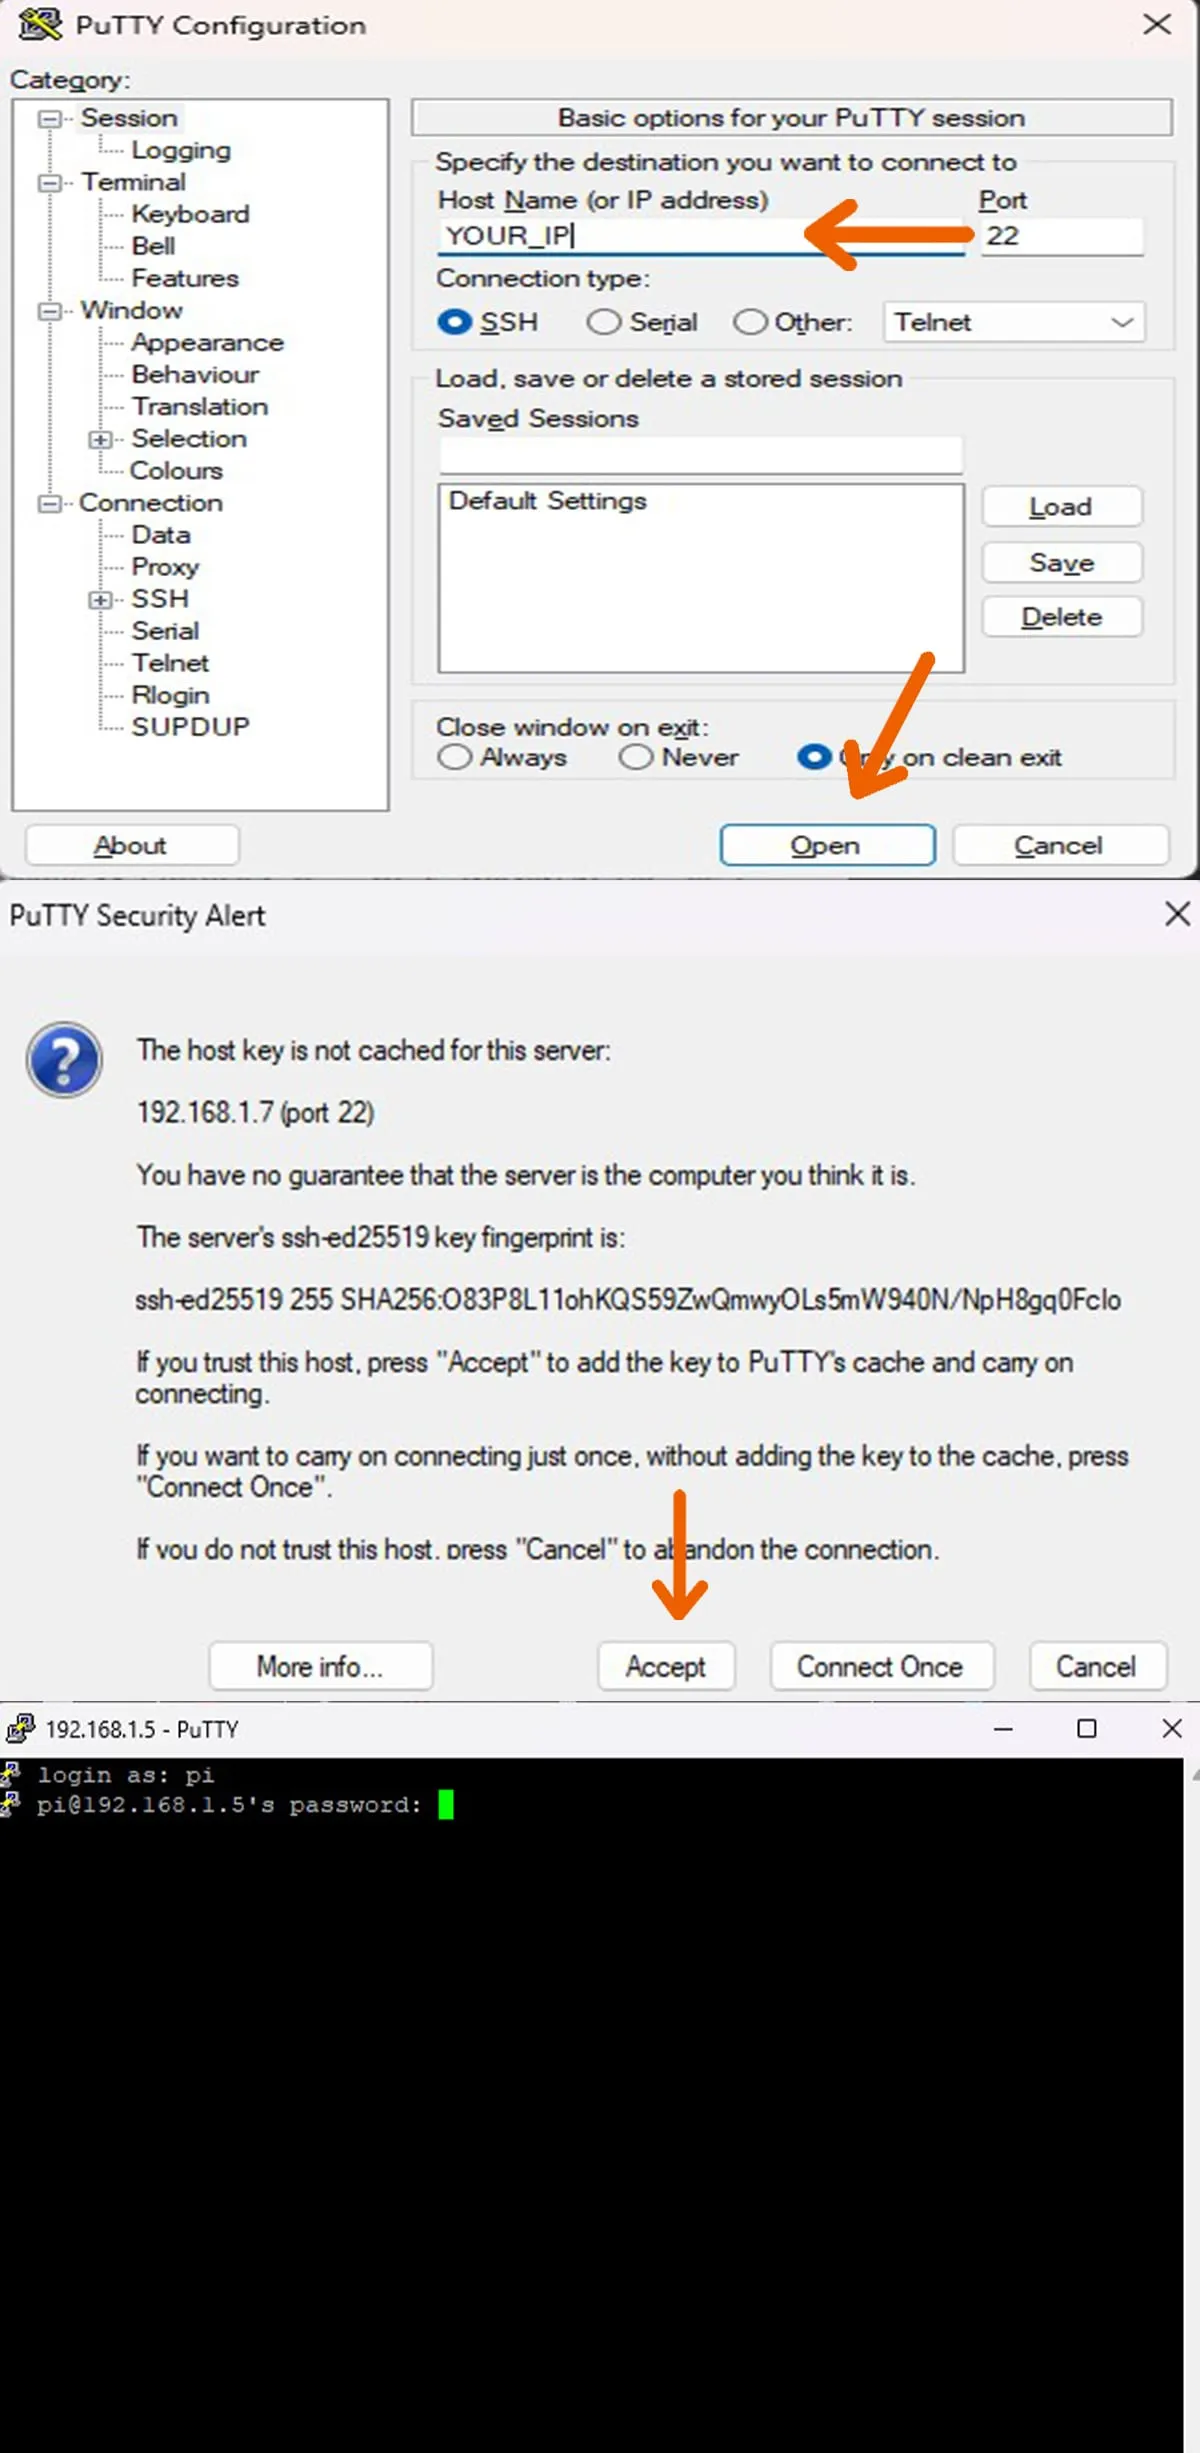
- 3. Open PuTTY and enter the IP address of your Raspberry Pi in the “Host Name” field.
- 4. Click “Open”. If a PuTTY Security Alert message appears, click “Accept” to proceed.
- 5. Connect to the Raspberry Pi using the default username “pi” and the password that was set during the Raspberry Pi Imager process.
Downloading PuTTY gives the ability to install Docker.

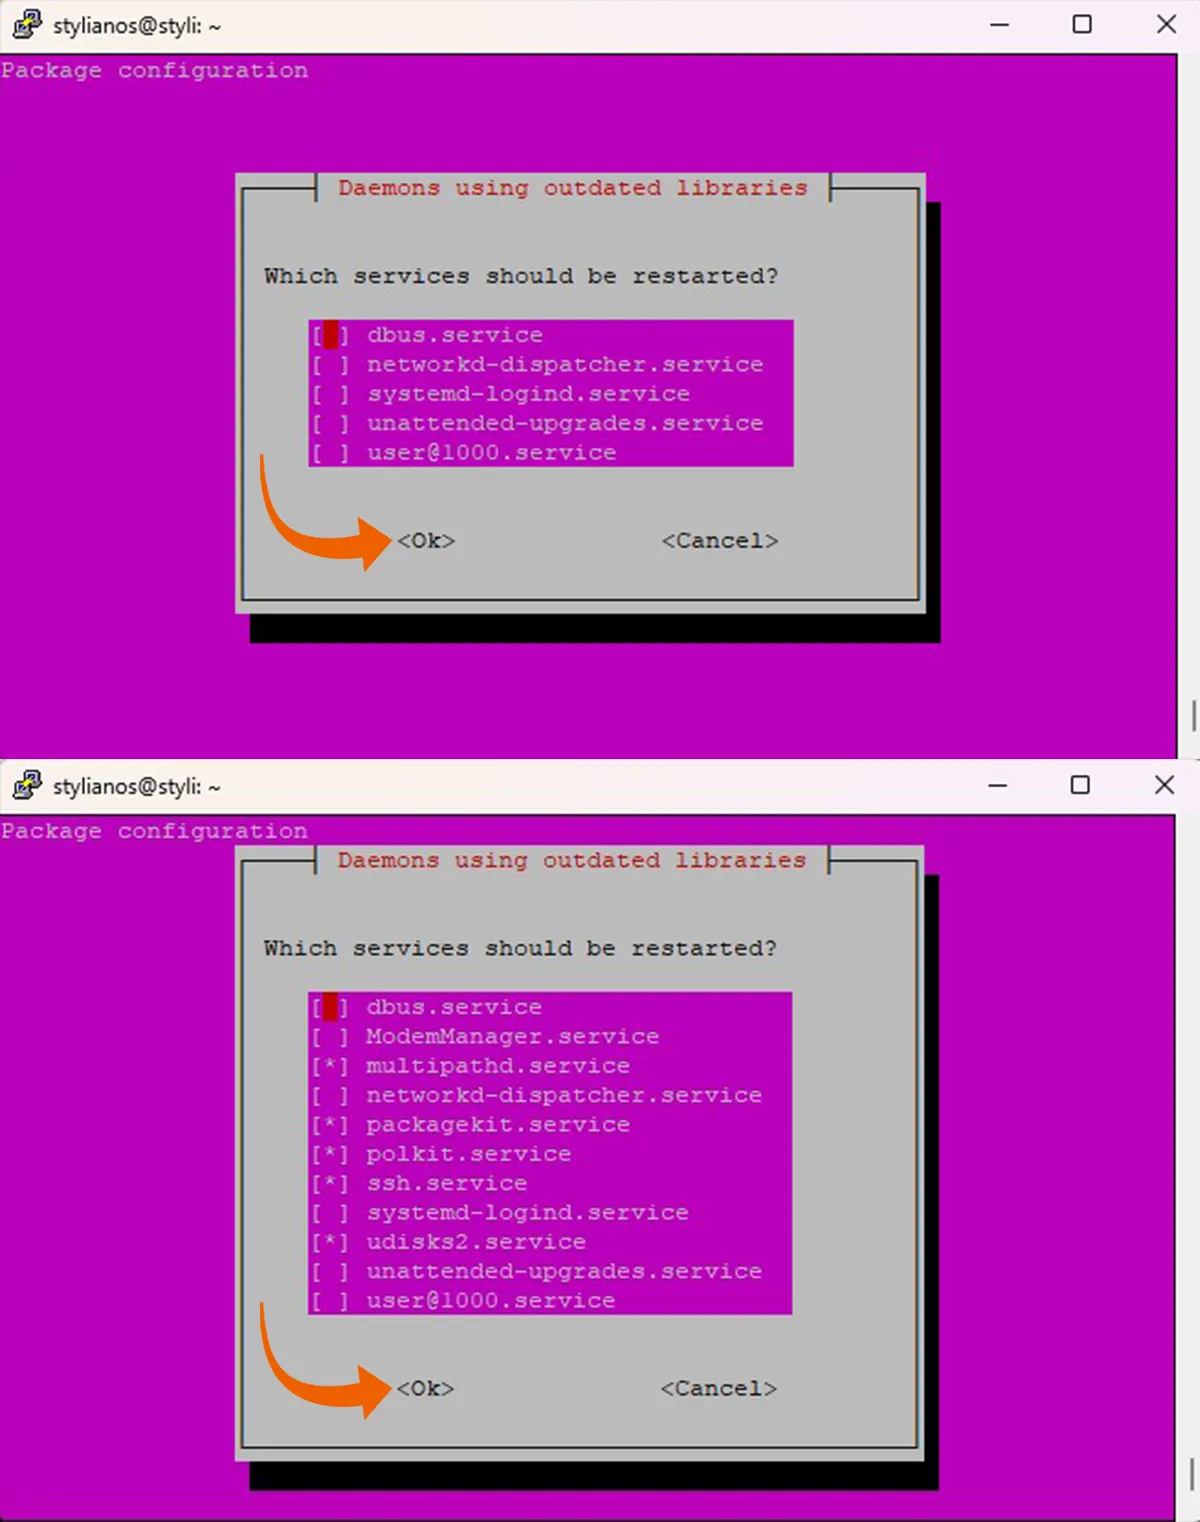
If prompted with the question ‘Which services should be restarted?’, please press the ‘OK’ button to confirm.

Step Three - Installation of Docker
- 1. Using PuTTY run the following commands to install Docker:
- $ sudo apt update
- $ sudo apt upgrade
- $ sudo apt install docker.io
- $ sudo usermod -aG docker pi
- $ sudo reboot
- 2. Once the system has rebooted, log back in using PuTTY.
- $ groups
- 3. Run the command:
- $ docker run hello-world
Verify that the Docker installation was successful by running the command:
This should list “docker” as one of the groups.
This should display the message “Hello from Docker!” and confirm that the installation was successful.
Step Four - Portainer
- 1. Install Portainer by running the following commands in the PuTTY:
- $ sudo docker pull portainer/portainer-ce:latest
- $
sudo docker run -d -p 9000:9000 --name=portainer --restart=always -v /var/run/docker.sock:/var/run/docker.sock -v portainer_data:/data portainer/portainer-ce:latest - 2. Access the Portainer web application by navigating to http://[PI_IP_ADDRESS]:9000 in a web browser,
replacing [PI_IP_ADDRESS] with the IP address of your Raspberry Pi. - 3. Log in with the default username “admin” and create a password for Portainer.
- 4. Once logged in, navigate to the “Local” tab > “Images” and enter “docker.io nightscout/cgm-remote-monitor” in the “Image” field.
- 5. Click “Pull the Image” to download the image.
- 6. After the image has been downloaded, navigate to the “Stacks” tab, and click “Add Stack” on the top right corner.
- 7. Give a desired name to the stack.
- 8. In the “Web Editor” field, copy and paste the following code:
version: "3.4" services: nightscout: image: nightscout/cgm-remote-monitor:14.2.6 environment: TZ: Europe/Berlin MONGO_CONNECTION: mongodb://mongo:27017/mycgmic API_SECRET: YOUR_API_SECRET BG_HIGH: 8 BG_LOW: 3.9 BG_TARGET_TOP: 7 BG_TARGET_BOTTOM: 3.9 AUTH_DEFAULT_ROLES: readable devicestatus-upload ENABLE: "careportal boluscalc food bwp cage sage iage iob cob basal ar2 rawbg pushover bgi pump openaps cors" SHOW_FORECAST: openaps SHOW_PLUGINS: "careportal openaps pump iob sage cage" CUSTOM_TITLE: "Nightscout" DISPLAY_UNITS: mmol ports: - "1337:1337" depends_on: - mongo labels: - "traefik.enable=true" # Change the below Host from `localhost` to be the web address where Nightscout is running. # Also change the email address in the `traefik` service below. - "traefik.http.routers.nightscout.rule=Host(`YOUR_PUBLIC_HOST_URL`)" - "traefik.http.routers.nightscout.entrypoints=websecure" - "traefik.http.routers.nightscout.tls.certresolver=le" volumes: - "/home/pi/docker/rpi-nightscout:/var/opt/ssl/:ro" restart: always mongo: image: mongo:4.4.9 volumes: - "./data:/data/db" ports: - "27017:27017" - "27018:27018" - "27019:27019" - "28017:28017" restart: always traefik: image: traefik:latest container_name: "traefik2" command: - "--providers.docker=true" - "--providers.docker.exposedbydefault=false" - "--entrypoints.web.address=:80" - "--entrypoints.web.http.redirections.entrypoint.to=websecure" - "--entrypoints.websecure.address=:443" - "--certificatesresolvers.le.acme.httpchallenge=true" - "--certificatesresolvers.le.acme.httpchallenge.entrypoint=web" - "--certificatesresolvers.le.acme.storage=/letsencrypt/acme.json" # Change the below to match your email address - "--certificatesresolvers.le.acme.email=YOUR_EMAIL" ports: - "443:443" - "80:80" volumes: - "./letsencrypt:/letsencrypt" - "/var/run/docker.sock:/var/run/docker.sock:ro" restart: always- 9. After configuring the stack, click the “Deploy” button at the bottom of the page.
- 10. Access the Nightscout site by entering https://[YOUR_IP]:1337, replacing [YOUR_IP] with the IP address of your Raspberry Pi,
in a browser such as Microsoft Edge or Firefox. Avoid using Chrome due to SSL certificate issues. - 11. Verify that the site is up and running by checking if you can access the Nightscout page.
Portainer is a web-based tool that allows you to easily manage your Docker containers.
For detailed instructions on installing and using Portainer, please refer to the documentation here.
Important: API_SECRET must be a minimum of 12 characters in length.

Whatever problem arises, do not hesitate to contact us; our aim is to provide the most readable and user-friendly guide.